Shineyrock
blog
-
dislike -5
How to Draw Charts Using JavaScript and HTML5 Canvas
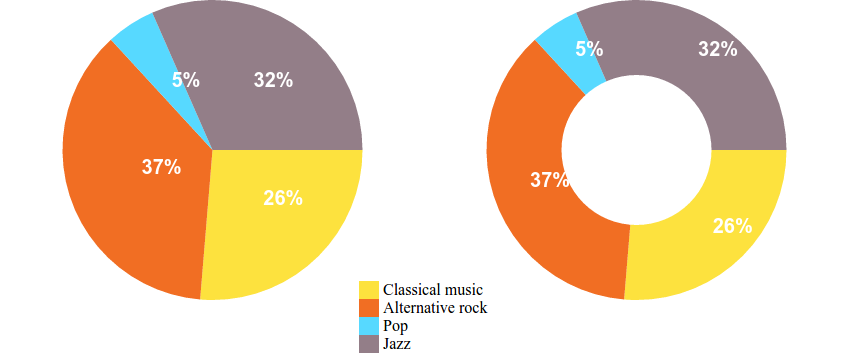


What You'll Be Creating In this tutorial, I will show you how to use JavaScript and the canvas to display numerical information in the form of pie charts and doughnut charts.
What Is a Pie Chart?
A chart is a statistical tool used to graphically represent numerical data. A pie chart displays that numerical data as a circle divided into slices. The size of each slice is proportional to the numeric value that it stands for.
What Is a Doughnut Chart?
To put it simply, a doughnut chart is a variation on a pie chart. The difference is that the slices are cut towards the center of the pie such that only the rim is visible. In this way, the chart looks like a doughnut, hence the name.
Start Drawing With the Canvas
Before drawing the pie chart, we will take a look at drawing its parts. We will see how we can use the canvas component and JavaScript to draw:
- a line
- an arc (a part of a circle)
- a color-filled shape
To start drawing using the HTML5 canvas, we'll need to create a few things:
- One folder to hold the project files; let's call this folder piechart-tutorial.
- One HTML file index.html inside the piechart-tutorial folder. This file will contain the HTML code.
- One JS file script.js inside the piechart-tutorial folder. This file will contain our JavaScript code.
We'll keep things very simple and add the following code inside index.html:
<html>
<body>
    <canvas id="myCanvas"></canvas>
	<script type="text/javascript" src="script.js"></script>
</body>
</html>
We have the
<canvas>element with the IDmyCanvasso that we can reference it in our JS code. We then load the JS code via the<script>tag.Inside script.js, the JS code will first get a reference to the canvas and then set its width and height. To draw on the canvas, we only need a reference to its 2D context, which contains all the drawing methods.
var myCanvas = document.getElementById("myCanvas");
myCanvas.width = 300;
myCanvas.height = 300;

var ctx = myCanvas.getContext("2d");
Adding a Few Helper Functions
Now that we have the canvas set up and also a reference to the drawing canvas, let's define a few JavaScript functions that we will be able to reuse when drawing the pie chart. We will add the functions in our script.js file.
function drawLine(ctx, startX, startY, endX, endY, color){
    ctx.save();
    ctx.strokeStyle = color;
    ctx.beginPath();
    ctx.moveTo(startX,startY);
    ctx.lineTo(endX,endY);
    ctx.stroke();
    ctx.restore();
}
The
drawLinefunction takes six parameters:-
ctx: reference to the drawing context -
startX: the X coordinate of the line's starting point -
startY: the Y coordinate of the line's starting point -
endX: the X coordinate of the line's end point -
endY: the Y coordinate of the line's end point -
color: the color of the line
The first thing we do inside the function is save the current context. After that, we start drawing the line by calling
beginPath(). This informs the drawing context that we are starting to draw something new on the canvas. We usemoveTo()to set the starting point, calllineTo()to indicate the end point, and then do the actual drawing by callingstroke().Let's now see how we can draw a part of a circle, also called an arc.
function drawArc(ctx, centerX, centerY, radius, startAngle, endAngle, color){
    ctx.save();
    ctx.strokeStyle = color;
    ctx.beginPath();
    ctx.arc(centerX, centerY, radius, startAngle, endAngle);
    ctx.stroke();
    ctx.restore();
}
The
drawArcfunction takes seven parameters:-
ctx: reference to the drawing context -
centerX: the X coordinate of the circle's center -
centerY: the Y coordinate of the circle's center -
radius: the X coordinate of the line's end point -
startAngle: the start angle in radians where the portion of the circle starts -
endAngle: the end angle in radians where the portion of the circle ends -
color: the color of the arc
We've seen how to draw a line and how to draw an arc, so now let's see how to draw a colored shape. Since our goal is to draw a pie chart that is made up of slices, let's create a function that draws a pie slice.
function drawPieSlice(ctx,centerX, centerY, radius, startAngle, endAngle, fillColor, strokeColor) {
    ctx.save();
    ctx.fillStyle = fillColor;
    ctx.strokeStyle = strokeColor;
    ctx.beginPath();
    ctx.moveTo(centerX, centerY);
    ctx.arc(centerX, centerY, radius, startAngle, endAngle, strokeColor);
    ctx.closePath();
    ctx.fill();
    ctx.restore();
}
The
drawPieSlicefunction takes seven parameters:-
ctx: reference to the drawing context -
centerX: the X coordinate of the circle's center -
centerY: the Y coordinate of the circle's center -
radius: the X coordinate of the line's end point -
startAngle: the start angle in radians where the portion of the circle starts -
endAngle: the end angle in radians where the portion of the circle ends -
fillColor: the color used to fill the slice -
strokeColor: the color used to draw the perimeter of the slice
Here is an example for calling three functions:
drawLine(ctx, 200, 200, 300, 300, "#000");
drawArc(ctx, 250, 250, 150, 0, Math.PI/3, "#000");
drawPieSlice(ctx, 250, 250, 150, Math.PI/2, Math.PI/2 + Math.PI/3, "#F00", "#000");
It will produce this result:
Now we have all the tools necessary to draw a pie chart, so let's see how we use them together.
Drawing the Pie Chart
Conceptually, any chart has two main parts:
- The data model contains the numerical data to be represented. This is structured in a format specific to the type of chart.
- The graphical representation is how the numerical data in the data model gets represented by visual elements according to some rules in the form of math formulas.
The Pie Chart Data Model
The most common way to structure the data model for pie charts is a series of categories and corresponding values, where each category and value is associated with a slice of the pie.
As an example, the data model of a pie chart displaying the number of vinyls I have grouped by genre would look something like:
- Classical music: 16
- Alternative rock: 12
- Pop: 18
- Jazz: 32
This data can be passed to our pie chart drawing class in the form of an object. We will be passing it to our
PieChartobject later:{ "Classical Music": 16, "Alternative Rock": 12, "Pop": 18, "Jazz": 32, }The Pie Chart Graphical Representation
The pie chart uses a circle to display the information in the data model by dividing it into slices. Each slice corresponds to a category from the data model, and the size of the slice is proportional to the category value.
My small collection of 88 vinyls has four categories. Each category will get a slice of the pie chart proportional to the number of vinyls in that category.
But how do we measure the size of a slice? That's easy—we do that by the angle at the tip of the slice. All we have to know is that the full circle corresponds to an angle of
360 degreesor2 * PI. So half a circle would be180 degorPI, a quarter90 degorPI/2, and so on.To determine the angle for each category slice, we use the formula:
slice angle = 2 * PI * category value / total valueAccording to this formula, the 16 classical music vinyls will get a slice angle of approximately 0.36 * PI or 64.8 deg.
Let's get to drawing. For this, we will use a JavaScript class which we will name
Piechart. The constructor will receive oneoptionsargument, an object containing the following:-
canvas: reference to the canvas where we want to draw the pie chart -
data: reference to an object holding the data model -
colors: an array holding the colors we want to use for each slice -
seriesName: a string that holds the chart title -
padding: to tell us how much padding should be added to the chart -
donutHoleSize: specifies the fraction that should be cut out of the pie chart. -
titleOptions: an object that contains information about the title's font, size, alignment, color, etc.
The
Piechartclass also contains one method,draw(), which does the actual drawing of the chart.var Piechart = function(options){ constructor(options) { this.options = options; this.canvas = options.canvas; this.ctx = this.canvas.getContext("2d"); this.colors = options.colors; this.titleOptions = options.titleOptions; this.totalValue = [...Object.values(this.options.data)].reduce((a, b) => a + b, 0); this.radius = Math.min(this.canvas.width / 2, this.canvas.height / 2) - options.padding; } drawSlices() { var colorIndex = 0; var startAngle = -Math.PI / 2; for (var categ in this.options.data) { var val = this.options.data[categ]; var sliceAngle = (2 * Math.PI * val) / this.totalValue; drawPieSlice( this.ctx, this.canvas.width / 2, this.canvas.height / 2, this.radius, startAngle, startAngle + sliceAngle, this.colors[colorIndex % this.colors.length] ); startAngle += sliceAngle; colorIndex++; } } }The class starts by storing the passed
optionsin different properties inside theconstructor()method. It stores thecanvasreference and creates a drawing context also stored as a class member. Then it stores thecolorsarray passed as options.We convert our object values into an array inside the constructor and then use the reduce() method to get the total of all data points. This value is later used to calculate the angle of different slices. We also calculate the radius of our pie chart within the constructor method by taking the minimum value between half of the canvas width and half of the canvas height and then subtracting the padding. Subtracting the padding to calculate the radius helps introduce some space between different chart elements.
The
drawSlices()method does all the actual drawing of the pie chart. For each category in the data model, we apply the formula mentioned above to calculate the pie slice angle. Finally, we use thedrawPieSlice()function, using the center of the canvas as the center of the slice. We also offset the start and end angle of the slices each time we draw a category, otherwise the slices would overlap.To use the class, we have to create an instance and then call the
drawSlices()method on the created object.var myPiechart = new Piechart( { canvas: myCanvas, data: { "Classical Music": 16, "Alternative Rock": 12, "Pop": 18, "Jazz": 32 }, colors: ["#80DEEA", "#FFE082", "#FFAB91", "#CE93D8"] } ); myPiechart.drawSlices();And the result looks like this:


Drawing the Doughnut Chart
We've seen how to draw the pie chart. We also know that a doughnut chart differs only by having a hole in the middle of the chart. How do we draw the hole? We can draw a white circle over the pie chart.
Let's modify the
drawSlices()method of thePiechartclass to do that.drawSlices() { var colorIndex = 0; var startAngle = -Math.PI / 2; for (var categ in this.options.data) { var val = this.options.data[categ]; var sliceAngle = (2 * Math.PI * val) / this.totalValue; drawPieSlice( this.ctx, this.canvas.width / 2, this.canvas.height / 2, this.radius, startAngle, startAngle + sliceAngle, this.colors[colorIndex % this.colors.length] ); startAngle += sliceAngle; colorIndex++; } if (this.options.doughnutHoleSize) { drawPieSlice( this.ctx, this.canvas.width / 2, this.canvas.height / 2, this.options.doughnutHoleSize * this.radius, 0, 2 * Math.PI, "#FFF", "#FFF" ); drawArc( this.ctx, this.canvas.width / 2, this.canvas.height / 2, this.options.doughnutHoleSize * this.radius, 0, 2 * Math.PI, "#000" ); } }The added code looks in the
optionsparameter for a member variabledoughnutHoleSize. If this doesn't exist in the options, then the code will draw the pie chart as before, but if it does exist, then a white circle is drawn with the same center as the pie chart.The radius of the circle is determined by multiplying the pie chart radius and the value of
doughnutHoleSize. This should be a number between 0 and 1, where 0 will result in a pie chart, and any values higher than 0 would result in a doughnut with the hole larger and larger, 1 making the chart invisible.To draw a doughnut chart with a hole half the size of the chart, we would need to use a
doughnutHoleSizeof 0.5 and make the following calls:var myDougnutChart = new Piechart( { canvas:myCanvas, data:myVinyls, colors:["#fde23e","#f16e23", "#57d9ff","#937e88"], doughnutHoleSize:0.5 } ); myDougnutChart.drawSlices();And here is the result:


Adding Labels and a Chart Legend
Our pie chart and doughnut chart look pretty good, but we can make them even better by adding two things:
- value labels: showing the percentage corresponding to each slice
- a chart legend: showing the categories and their corresponding colors in the chart
Usually, values associated with the slices are represented as percentage values calculated as
100 * value associated with a slice / total value, with the whole circle representing100%.For example, in the case of our sample data, vinyls with classical music would represent approximately
26%. It would be nice to be able to write that value right on the corresponding slice. To do that, we will use thefillText(text,x,y)function of the drawing context. This function takes three parameters: the text and thexandycoordinates.How do we calculate the
xandycoordinates at which to place the text? We have to make use of some geometry knowledge and something called polar coordinates. Basically, polar coordinates use a radius and an angle to define the position of a point. The two formulas we will use are:x = R * cos(angle)y = R * sin(angle)We will apply these two formulas to place the text halfway along the pie chart radius and halfway around the angle for each pie slice. To do this, we need to add another method called
drawLabels()to ourPiechartclass:drawLabels() { var colorIndex = 0; var startAngle = -Math.PI / 2; for (var categ in this.options.data) { var val = this.options.data[categ]; var sliceAngle = (2 * Math.PI * val) / this.totalValue; var labelX = this.canvas.width / 2 + (this.radius / 2) * Math.cos(startAngle + sliceAngle / 2); var labelY = this.canvas.height / 2 + (this.radius / 2) * Math.sin(startAngle + sliceAngle / 2); if (this.options.doughnutHoleSize) { var offset = (this.radius * this.options.doughnutHoleSize) / 2; labelX = this.canvas.width / 2 + (offset + this.radius / 2) * Math.cos(startAngle + sliceAngle / 2); labelY = this.canvas.height / 2 + (offset + this.radius / 2) * Math.sin(startAngle + sliceAngle / 2); } var labelText = Math.round((100 * val) / this.totalValue); this.ctx.fillStyle = "black"; this.ctx.font = "32px Khand"; this.ctx.fillText(labelText + "%", labelX, labelY); startAngle += sliceAngle; } }The code goes over each slice, calculates the percentage, calculates the position, and uses the
fillText()method to draw it on the chart. We have used thefillStyleproperty to set the text color to black and thefontproperty to set the size and font family of the label. It's also important to note that if the chart is a doughnut chart and thedoughnutHoleSizeis set, then the label will be pushed towards the edge of the chart to make it centered on the doughnut slice.And here's how the resulting charts look with the value labels:
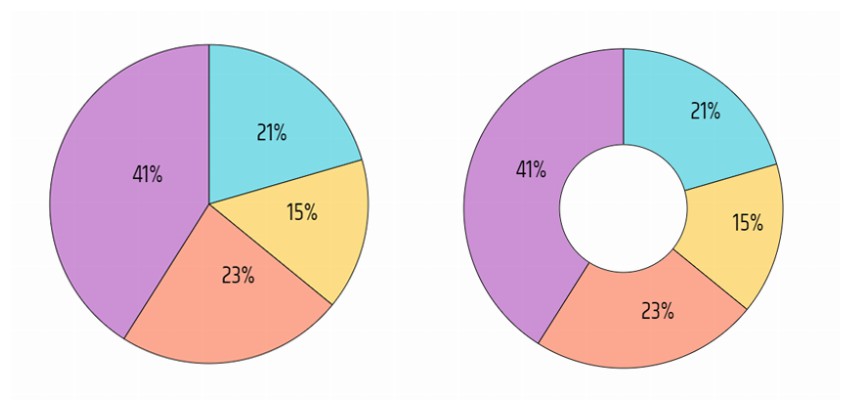


To complete our chart, the last thing we will add is the chart legend. Our chart legend will display the categories of our data model and the color used for the corresponding slice. First, we have to make some modifications to our
index.htmlfile by adding a<div>tag that will store our legend element.<html> <body> <canvas id="myCanvas"></canvas> <div for="myCanvas"></div> <script type="text/javascript" src="script.js"></script> </body> </html>Then in script.js we add the code that creates the content of the legend element. We do this inside the
drawLegend()method of thePiechartclass:drawLegend() { let pIndex = 0; let legend = document.querySelector("div[for='myCanvas']"); let ul = document.createElement("ul"); legend.append(ul); for (let ctg of Object.keys(this.options.data)) { let li = document.createElement("li"); li.style.listStyle = "none"; li.style.borderLeft = "20px solid " + this.colors[pIndex % this.colors.length]; li.style.padding = "5px"; li.textContent = ctg; ul.append(li); pIndex++; } }The code looks for a
legendelement passed via theoptionsparameter. If one is supplied, this element is filled in with the HTML code containing a colored box and the name of the data model category.Our charts will also have a title to describe what the chart is supposed to show us. We can do that by adding another method called
drawTitle()to ourPieChartclass. The configuration options for the chart title will be taken from thetitleOptionsobject passed to thePieChartclass.drawTitle() { this.ctx.save(); this.ctx.textBaseline = "bottom"; this.ctx.textAlign = this.titleOptions.align; this.ctx.fillStyle = this.titleOptions.fill; this.ctx.font = `${this.titleOptions.font.weight} ${this.titleOptions.font.size} ${this.titleOptions.font.family}`; let xPos = this.canvas.width / 2; if (this.titleOptions.align == "left") { xPos = 10; } if (this.titleOptions.align == "right") { xPos = this.canvas.width - 10; } this.ctx.fillText(this.options.seriesName, xPos, this.canvas.height); this.ctx.restore(); }One more thing that we can do for our own convenience is to define a
draw()method that calls all other methods of the class to draw the whole chart.draw() { this.drawSlices(); this.drawLabels(); this.drawTitle(); this.drawLegend(); }We also need to make a change to the way we call the drawing of our pie chart like this:
var myPiechart = new PieChart({
  canvas: myCanvas,
  seriesName: "Vinyl records",
  padding: 40,
  doughnutHoleSize: 0.4,
  data: {
    "Classical Music": 16,
    "Alternative Rock": 12,
    "Pop": 18,
    "Jazz": 32
  },
  colors: ["#80DEEA", "#FFE082", "#FFAB91", "#CE93D8"],
  titleOptions: {
    align: "center",
    fill: "black",
    font: {
      weight: "bold",
      size: "18px",
      family: "Lato"
    }
  }
});

myPiechart.draw();
And here is the resulting chart and chart legend:
Congratulations
We have seen that drawing charts using the HTML5 canvas is actually not that hard. It only requires a bit of math and a bit of JavaScript knowledge. You now have everything you need to draw your own pie charts and doughnut charts.
If you want a quick and easy solution for creating not only pie charts and doughnut charts but also loads of other types of charts, you can download the Infographic Charts and Graphics HTML Tags Library or its WordPress plugin counterpart Charts and Graphs WordPress Visual Designer.

martijn broeders
founder/ strategic creative at shineyrock web design & consultancy
e-mail: .(JavaScript must be enabled to view this email address)
phone: 434 210 0245
By - category
By - date
-
December, 2023
-
The Best Small Business Web Designs by DesignRush
/ 2
2 -
October, 2022
-
Create Modern Vue Apps Using Create-Vue and Vite
/ 9 -
September, 2022
-
How to Fix the “There Has Been a Critical Error in Your Website” Error in WordPress
/ 3 -
How To Fix The “There Has Been A Critical Error in Your Website” Error in WordPress
-
August, 2022
-
How to Create a Privacy Policy Page in WordPress
/ 7 -
WordPress Website Maintenance Guide For Beginners
/ 8 -
April, 2022
-
How Long Does It Take to Learn JavaScript?
/ -1
-1 -
How Long Does it Take to Learn JavaScript
/ 1 -
January, 2022
-
The Best Way to Deep Copy an Object in JavaScript
/ -1 -
December, 2021
-
/ 4
-
/ -5
-
Adding and Removing Elements From Arrays in JavaScript
/ -3 -
Create a JavaScript AJAX Post Request: With and Without jQuery
/ 9 -
November, 2021
-
5 Real-Life Uses for the JavaScript reduce() Method
/ -9 -
July, 2021
-
How to Enable or Disable a Button With JavaScript: jQuery vs. Vanilla
/ 4 -
How to Enable or Disable a Button With JavaScript: jQuery vs Vanilla
/ -5 -
Confirm Yes or No With JavaScript
/ -4 -
June, 2021
-
How to Change the URL in JavaScript: Redirecting
/ -1 -
May, 2021
-
27 Best Tab and Accordion Widget Plugins for WordPress (Free & Premium)
/ 13 -
21 Best Tab and Accordion Widget Plugins for WordPress (Free & Premium)
/ -11 -
30 HTML Best Practices for Beginners
/ -7 -
31 Best WordPress Calendar Plugins and Widgets (With 5 Free Plugins)
-
25 Ridiculously Impressive HTML5 Canvas Experiments
/ -3 -
/ 1
-
How to Implement Email Verification for New Members
/ 2 -
How to Create a Simple Web-Based Chat Application
/ 6 -
April, 2021
-
30 Popular WordPress User Interface Elements
/ -2 -
Top 18 Best Practices for Writing Super Readable Code
/ -1 -
Best Affiliate WooCommerce Plugins Compared
/ -11 -
March, 2021
-
18 Best WordPress Star Rating Plugins
/ 14 -
10+ Best WordPress Twitter Widgets
/ 2 -
20+ Best WordPress Booking and Reservation Plugins
/ 4 -
February, 2021
-
Working With Tables in React: Part Two
/ -3 -
Best CSS Animations and Effects on CodeCanyon
/ -17 -
30 CSS Best Practices for Beginners
/ 3 -
How to Create a Custom WordPress Plugin From Scratch
/ 4 -
May, 2020
-
10 Best Responsive HTML5 Sliders for Images and Text… and 3 Free Options
/ -6 -
16 Best Tab and Accordion Widget Plugins for WordPress
/ -8 -
April, 2020
-
18 Best WordPress Membership Plugins and 5 Free Plugins
/ 4 -
25 Best WooCommerce Plugins for Products, Pricing, Payments and More
/ 1 -
10 Best WordPress Twitter Widgets
1 / 10 -
March, 2020
-
12 Best Contact Form PHP Scripts for 2020
/ -2 -
September, 2017
-
February, 2020
-
20 Popular WordPress User Interface Elements
/ -4 -
10 Best WordPress Star Rating Plugins
/ -4 -
January, 2020
-
12 Best CSS Animations on CodeCanyon
/ -2 -
12 Best WordPress Booking and Reservation Plugins
/ 1 -
20 Best WordPress Calendar Plugins and Widgets
/ -4 -
December, 2019
-
12 Elegant CSS Pricing Tables for Your Latest Web Project
/ 9 -
24 Best WordPress Form Plugins for 2020
/ -2 -
September, 2019
-
Getting Started With Django: Newly Updated Course
/ -1 -
July, 2019
-
Create a Blog for Each Category or Department in Your WooCommerce Store
/ 4 -
April, 2019
-
8 Best WordPress Booking and Reservation Plugins
/ -15 -
March, 2019
-
Best Exit Popups for WordPress Compared
/ 18 -
Best Exit Popups for WordPress Compared
/ -3 -
11 Best Tab & Accordion WordPress Widgets & Plugins
/ -10 -
12 Best Tab & Accordion WordPress Widgets & Plugins
1 / 1 -
February, 2019
-
New Course: Practical React Fundamentals
/ 2 -
January, 2019
-
Short Course: Better Angular App Architecture With Modules
/ 1 -
Preview Our New Course on Angular Material
/ 3 -
Build Your Own CAPTCHA and Contact Form in PHP
/ -3 -
December, 2018
-
Object-Oriented PHP With Classes and Objects
/ 1 -
Best Practices for ARIA Implementation
/ -5 -
Accessible Apps: Barriers to Access and Getting Started With Accessibility
/ -4 -
November, 2018
-
Dramatically Speed Up Your React Front-End App Using Lazy Loading
/ 16 -
October, 2018
-
15 Best Modern JavaScript Admin Templates for React, Angular, and Vue.js
/ -16 -
15 Best Modern JavaScript Admin Templates for React, Angular and Vue.js
/ 3 -
19 Best JavaScript Admin Templates for React, Angular, and Vue.js
/ 2 -
New Course: Build an App With JavaScript and the MEAN Stack
/ 10 -
Hands-on With ARIA: Accessibility Recipes for Web Apps
/ 4 -
10 Best WordPress Facebook Widgets
13 -
September, 2018
-
Hands-on With ARIA: Accessibility for eCommerce
/ 6 -
New eBooks Available for Subscribers
/ -8 -
Hands-on With ARIA: Homepage Elements and Standard Navigation
/ 11 -
/ -5
-
Site Accessibility: Getting Started With ARIA
/ 5 -
August, 2018
-
How Secure Are Your JavaScript Open-Source Dependencies?
/ -2 -
New Course: Secure Your WordPress Site With SSL
/ -2 -
Testing Components in React Using Jest and Enzyme
/ -8 -
Testing Components in React Using Jest: The Basics
/ -5 -
July, 2018
-
15 Best PHP Event Calendar and Booking Scripts
/ -3 -
June, 2018
-
Create Interactive Gradient Animations Using Granim.js
/ 11 -
How to Build Complex, Large-Scale Vue.js Apps With Vuex
1 / -3 -
Examples of Dependency Injection in PHP With Symfony Components
/ -6 -
May, 2018
-
Set Up Routing in PHP Applications Using the Symfony Routing Component
1 / 9 -
A Beginner’s Guide to Regular Expressions in JavaScript
/ 7 -
Introduction to Popmotion: Custom Animation Scrubber
/ -6 -
Introduction to Popmotion: Pointers and Physics
/ -10 -
New Course: Connect to a Database With Laravel’s Eloquent ORM
/ -7 -
How to Create a Custom Settings Panel in WooCommerce
/ -13 -
Building the DOM faster: speculative parsing, async, defer and preload
1 / 4 -
20 Useful PHP Scripts Available on CodeCanyon
3 / 51 -
April, 2018
-
How to Find and Fix Poor Page Load Times With Raygun
/ 1 -
Introduction to the Stimulus Framework
/ -12 -
Single-Page React Applications With the React-Router and React-Transition-Group Modules
-
/ 7
-
12 Best Contact Form PHP Scripts
1 / -3 -
Getting Started With the Mojs Animation Library: The ShapeSwirl and Stagger Modules
-
Getting Started With the Mojs Animation Library: The Shape Module
/ -1 -
Getting Started With the Mojs Animation Library: The HTML Module
/ 3 -
Project Management Considerations for Your WordPress Project
/ -9 -
8 Things That Make Jest the Best React Testing Framework
/ 5 -
March, 2018
-
Creating an Image Editor Using CamanJS: Layers, Blend Modes, and Events
/ 1 -
New Short Course: Code a Front-End App With GraphQL and React
/ 1 -
Creating an Image Editor Using CamanJS: Applying Basic Filters
/ -11 -
Creating an Image Editor Using CamanJS: Creating Custom Filters and Blend Modes
/ -1 -
Modern Web Scraping With BeautifulSoup and Selenium
/ 1 -
Challenge: Create a To-Do List in React
1 / -2 -
Deploy PHP Web Applications Using Laravel Forge
/ -3 -
Getting Started With the Mojs Animation Library: The Burst Module
/ 4 -
/ -9
-
10 Things Men Can Do to Support Women in Tech
/ -2 -
February, 2018
-
A Gentle Introduction to Higher-Order Components in React: Best Practices
/ -5 -
A Gentle Introduction to HOC in React: Learn by Example
/ 1 -
A Gentle Introduction to Higher-Order Components in React
/ -7 -
Creating Pretty Popup Messages Using SweetAlert2
/ 7 -
Creating Stylish and Responsive Progress Bars Using ProgressBar.js
/ 16 -
18 Best Contact Form PHP Scripts for 2022
/ -2 -
How to Make a Real-Time Sports Application Using Node.js
/ -3 -
Creating a Blogging App Using Angular & MongoDB: Delete Post
/ -18 -
Set Up an OAuth2 Server Using Passport in Laravel
/ 1 -
Creating a Blogging App Using Angular & MongoDB: Add Post
/ -1 -
Introduction to Mocking in Python
/ 1 -
Creating a Blogging App Using Angular & MongoDB: Show Post
/ 9 -
Creating a Blogging App Using Angular & MongoDB: Home
/ 6 -
/ 3
-
Creating a Blogging App Using Angular & MongoDB: Login
/ 12 -
Creating Your First Angular App: Implement Routing
/ 12 -
Persisted WordPress Admin Notices: Part 4
/ -2 -
Creating Your First Angular App: Components, Part 2
/ 3 -
Persisted WordPress Admin Notices: Part 3
/ 4 -
How Laravel Broadcasting Works
/ -1 -
/ 7
-
Persisted WordPress Admin Notices: Part 2
/ -2 -
Create Your First Angular App: Storing and Accessing Data
/ 5 -
Persisted WordPress Admin Notices: Part 1
/ -1 -
Error and Performance Monitoring for Web & Mobile Apps Using Raygun
/ 5 -
Using Luxon for Date and Time in JavaScript
7 / -3 -
January, 2018
-
How to Create an Audio Oscillator With the Web Audio API
/ -8 -
How to Cache Using Redis in Django Applications
/ 2 -
20 Essential WordPress Utilities to Manage Your Site
/ -4 -
Introduction to API Calls With React and Axios
/ 13 -
Beginner’s Guide to Angular 4: HTTP
/ 13 -
Rapid Web Deployment for Laravel With GitHub, Linode, and RunCloud.io
/ 7 -
Beginners Guide to Angular 4: Routing
/ -10 -
Beginner’s Guide to Angular 4: Services
/ 1 -
Beginner’s Guide to Angular 4: Components
/ 1 -
Creating a Drop-Down Menu for Mobile Pages
/ 9 -
Introduction to Forms in Angular 4: Writing Custom Form Validators
/ 5 -
Getting Started With Redux: Connecting Redux With React
/ 12 -
Getting Started With Redux: Learn by Example
/ 14 -
Getting Started With Redux: Why Redux?
/ 11 -
How to Auto Update WordPress Salts
/ -4 -
How to Download Files in Python
/ -2 -
/ -19
-
Eloquent Mutators and Accessors in Laravel
1 / 15 -
/ -11
-
December, 2017
-
/ 13
-
10 Best HTML5 Sliders for Images and Text
/ 8 -
Site Authentication in Node.js: User Signup
/ -2 -
Creating a Task Manager App Using Ionic: Part 2
/ 2 -
Creating a Task Manager App Using Ionic: Part 1
/ 1 -
Introduction to Forms in Angular 4: Reactive Forms
/ 2 -
/ 4
-
Introduction to Forms in Angular 4: Template-Driven Forms
/ 3 -
24 Essential WordPress Utilities to Manage Your Site
/ 1 -
25 Essential WordPress Utilities to Manage Your Site
/ -8 -
Get Rid of Bugs Quickly Using BugReplay
1 / -16 -
Manipulating HTML5 Canvas Using Konva: Part 1, Getting Started
/ 6 -
10 Must-See Easy Digital Downloads Extensions for Your WordPress Site
/ -2 -
22 Best WordPress Booking and Reservation Plugins
/ -5 -
Understanding ExpressJS Routing
/ -6 -
15 Best WordPress Star Rating Plugins
/ 12 -
Creating Your First Angular App: Basics
/ -1 -
November, 2017
-
Inheritance and Extending Objects With JavaScript
/ -10 -
Introduction to the CSS Grid Layout With Examples
1 / 3 -
/ 5
-
Performant Animations Using KUTE.js: Part 5, Easing Functions and Attributes
/ -6 -
Performant Animations Using KUTE.js: Part 4, Animating Text
/ -11 -
Performant Animations Using KUTE.js: Part 3, Animating SVG
/ -9 -
New Course: Code a Quiz App With Vue.js
/ -2 -
Performant Animations Using KUTE.js: Part 2, Animating CSS Properties
-
/ 8
-
Performant Animations Using KUTE.js: Part 1, Getting Started
/ 1 -
10 Best Responsive HTML5 Sliders for Images and Text (Plus 3 Free Options)
/ -3 -
Single-Page Applications With ngRoute and ngAnimate in AngularJS
/ -14 -
Deferring Tasks in Laravel Using Queues
/ -3 -
/ 2
-
Site Authentication in Node.js: User Signup and Login
/ 8 -
Working With Tables in React, Part Two
/ -17 -
Working With Tables in React, Part One
/ 1 -
How to Set Up a Scalable, E-Commerce-Ready WordPress Site Using ClusterCS
/ -2 -
New Course on WordPress Conditional Tags
/ 2 -
October, 2017
-
/ -11
-
Building With Vue.js 2 and Firebase
6 / 11 -
/ -8
-
/ 1
-
Best Unique Bootstrap JavaScript Plugins
/ -6 -
/ -1
-
Essential JavaScript Libraries and Frameworks You Should Know About
/ 5 -
/ 3
-
Vue.js Crash Course: Create a Simple Blog Using Vue.js
/ -16 -
Build a React App With a Laravel RESTful Back End: Part 1, Laravel 5.5 API
/ 2 -
API Authentication With Node.js
/ -4 -
Beginner’s Guide to Angular: HTTP
/ 8 -
Beginner’s Guide to Angular: Routing
/ -4 -
Beginners Guide to Angular: Routing
/ -4 -
Beginner’s Guide to Angular: Services
/ 2 -
Beginner’s Guide to Angular: Components
/ 1 -
September, 2017
-
How to Create a Custom Authentication Guard in Laravel
/ 3 -
Learn Computer Science With JavaScript: Part 3, Loops
/ -3 -
Build Web Applications Using Node.js
/ 1 -
Learn Computer Science With JavaScript: Part 4, Functions
/ 4 -
Learn Computer Science With JavaScript: Part 2, Conditionals
/ 13 -
Learn Computer Science With JavaScript: Part 1, The Basics
/ -1 -
Create Interactive Charts Using Plotly.js, Part 5: Pie and Gauge Charts
/ -8 -
Create Interactive Charts Using Plotly.js, Part 4: Bubble and Dot Charts
/ 16 -
Create Interactive Charts Using Plotly.js, Part 3: Bar Charts
/ -11 -
Awesome JavaScript Libraries and Frameworks You Should Know About
/ -7 -
Create Interactive Charts Using Plotly.js, Part 2: Line Charts
/ -9 -
Bulk Import a CSV File Into MongoDB Using Mongoose With Node.js
/ -6 -
Build a To-Do API With Node, Express, and MongoDB
/ -8 -
Getting Started With End-to-End Testing in Angular Using Protractor
/ 10 -
TypeScript for Beginners, Part 4: Classes
/ -15 -
Object-Oriented Programming With JavaScript
/ 4 -
10 Best Affiliate WooCommerce Plugins Compared
/ 6 -
Stateful vs. Stateless Functional Components in React
/ 6 -
Make Your JavaScript Code Robust With Flow
/ -2 -
Build a To-Do API With Node and Restify
/ 7 -
Testing Components in Angular Using Jasmine: Part 2, Services
/ 3 -
Testing Components in Angular Using Jasmine: Part 1
/ -1 -
Creating a Blogging App Using React, Part 6: Tags
/ -10 -
August, 2017
-
React Crash Course for Beginners, Part 3
/ 4 -
React Crash Course for Beginners, Part 2
/ 5 -
React Crash Course for Beginners, Part 1
/ 3 -
Set Up a React Environment, Part 4
1 / 9 -
Set Up a React Environment, Part 3
/ -9 -
New Course: Get Started With Phoenix
/ -7 -
Set Up a React Environment, Part 2
/ 2 -
Command Line Basics and Useful Tricks With the Terminal
/ 8 -
How to Create a Real-Time Feed Using Phoenix and React
/ -4 -
Build a React App With a Laravel RESTful Back End: Part 1, Laravel 9 API
/ -4 -
Creating a Blogging App Using React, Part 5: Profile Page
/ -1 -
Pagination in CodeIgniter: The Complete Guide
/ 24 -
JavaScript-Based Animations Using Anime.js, Part 4: Callbacks, Easings, and SVG
-
JavaScript-Based Animations Using Anime.js, Part 3: Values, Timeline, and Playback
-
Learn to Code With JavaScript: Part 1, The Basics
/ 4 -
July, 2017
-
10 Elegant CSS Pricing Tables for Your Latest Web Project
/ -10 -
Getting Started With the Flux Architecture in React
/ -2 -
Getting Started With Matter.js: The Composites and Composite Modules
/ 1 -
Getting Started With Matter.js: The Engine and World Modules
/ 13 -
10 More Popular HTML5 Projects for You to Use and Study
/ -19 -
Understand the Basics of Laravel Middleware
/ -1 -
Iterating Fast With Django & Heroku
/ 9 -
Creating a Blogging App Using React, Part 4: Update & Delete Posts
/ 5 -
Creating a jQuery Plugin for Long Shadow Design
/ -12 -
How to Register & Use Laravel Service Providers
2 / -13 -
Unit Testing in React: Shallow vs. Static Testing
/ 4 -
Creating a Blogging App Using React, Part 3: Add & Display Post
/ 13 -
June, 2017
-
Creating a Blogging App Using React, Part 2: User Sign-Up
20 / -5 -
Creating a Blogging App Using React, Part 1: User Sign-In
/ 5 -
9 More Popular HTML5 Projects for You to Use and Study
/ 13 -
Creating a Grocery List Manager Using Angular, Part 2: Managing Items
/ 8 -
9 Elegant CSS Pricing Tables for Your Latest Web Project
/ -4 -
Dynamic Page Templates in WordPress, Part 3
/ -4 -
Angular vs. React: 7 Key Features Compared
/ 6 -
Creating a Grocery List Manager Using Angular, Part 1: Add & Display Items
/ 2 -
New eBooks Available for Subscribers in June 2017
/ 7 -
Create Interactive Charts Using Plotly.js, Part 1: Getting Started
/ 10 -
The 5 Best IDEs for WordPress Development (And Why)
/ -2 -
33 Popular WordPress User Interface Elements
/ 2 -
New Course: How to Hack Your Own App
/ -11 -
How to Install Yii on Windows or a Mac
/ 3 -
What Is a JavaScript Operator?
/ -7 -
How to Register and Use Laravel Service Providers
/ 9
waly Good blog post. I absolutely love this…