Shineyrock
blog
-
like 2
Introduction to Forms in Angular 4: Reactive Forms

What You'll Be Creating This is the second part of the series on Introduction to Forms in Angular 4. In the first part, we created a form using the template-driven approach. We used directives such as
ngModel,ngModelGroupandngFormto supercharge the form elements. In this tutorial, we will be taking a different approach to building forms—the reactive way.Reactive Forms
Reactive forms take a different approach compared to that of the template-driven forms. Here, we create and initialize the form control objects in our component class. They are intermediate objects that hold the state of the form. We will then bind them to the form control elements in the template.
The form control object listens to any change in the input control values, and they are immediately reflected in the object's state. Since the component has direct access to the data model structure, all changes can be synchronized between the data model, the form control object, and the input control values.

Practically speaking, if we are building a form for updating the user profile, the data model is the user object retrieved from the server. By convention, this is often stored inside the component's user property (
this.user). The form control object or the form model will be bound to the template's actual form control elements.Both these models should have similar structures, even if they are not identical. However, the input values shouldn't flow into the data model directly. The image describes how the user input from the template makes its way to the form model.
Let's get started.
Prerequisites
You don’t need to have followed part one of this series, for part two to make sense. However, if you are new to forms in Angular, I would highly recommend going through the template-driven strategy. The code for this project is available on my GitHub repository. Make sure that you are on the right branch and then download the zip or, alternatively, clone the repo to see the form in action.
If you prefer to start from scratch instead, make sure that you have Angular CLI installed. Use the
ngcommand to generate a new project.$ ng new SignupFormProject
Next, generate a new component for the
SignupFormor create one manually.ng generate component SignupForm
Replace the contents of app.component.html with this:
<app-signup-form> </app-signup-form>
Here is the directory structure for the src/ directory. I've removed some non-essential files to keep things simple.
.
├── app
│   ├── app.component.css
│   ├── app.component.html
│   ├── app.component.ts
│   ├── app.module.ts
│   ├── signup-form
│   │   ├── signup-form.component.css
│   │   ├── signup-form.component.html
│   │   └── signup-form.component.ts
│   └── User.ts
├── index.html
├── main.ts
├── polyfills.ts
├── styles.css
├── tsconfig.app.json
└── typings.d.ts
As you can see, a directory for the
SignupFormcomponent has been created automatically. That's where most of our code will go. I've also created a newUser.tsfor storing our User model.The HTML Template
Before we dive into the actual component template, we need to have an abstract idea of what we are building. So here is the form structure that I have in my mind. The signup form will have several input fields, a select element, and a checkbox element.
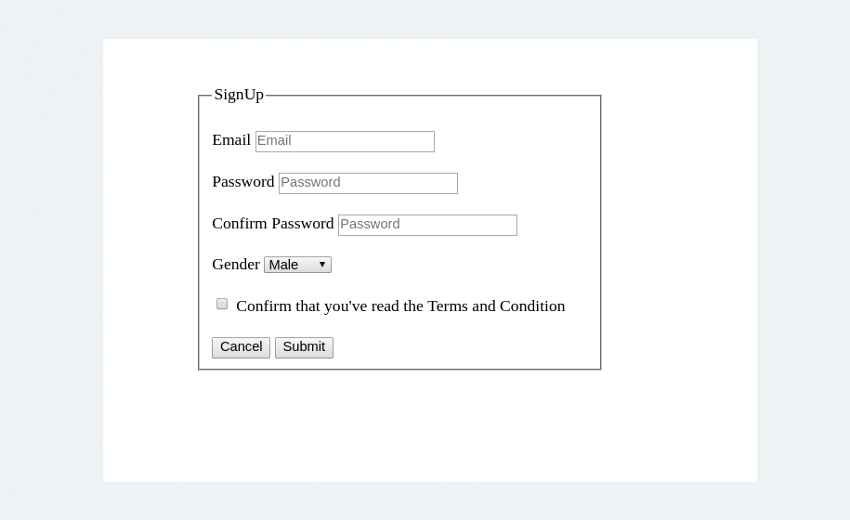
Here is the HTML template that we will be using for our registration page.
HTML Template
 <div class="row custom-row">
  <div class= "col-sm-5 custom-container jumbotron">

    <form class="form-horizontal">
        <fieldset>
    	  <legend>SignUp</legend>

            <!--- Email Block --->
            <div class="form-group">
    	      <label for="inputEmail">Email</label>
    		  <input type="text"
                id="inputEmail"
    	        placeholder="Email">
    	   	</div>
            <!--- Password Block --->
    	   	<div class="form-group">
    	      <label for="inputPassword">Password</label>
    	      <input type="password"
                id="inputPassword"
                placeholder="Password">
    	    </div>

    	    <div class="form-group">
    	      <label for="confirmPassword" >Confirm Password</label>
    	      <input type="password"
                id="confirmPassword"
                placeholder="Password">
    	    </div>

            <!--- Select gender Block --->
    	    <div class="form-group">
    	      <label for="select">Gender</label>
    	        <select id="select">
    	          <option>Male</option>
    	          <option>Female</option>
    	          <option>Other</option>
    	        </select>
    	    </div>

            <!--- Terms and conditions Block --->
             <div class="form-group checkbox">
              <label>
                <input type="checkbox"> Confirm that you've read the Terms and
                Conditions
              </label>
            </div>

           <!--- Buttons Block --->
    	    <div class="form-group">
    	        <button type="reset" class="btn btn-default">Cancel</button>
    	        <button type="submit" class="btn btn-primary">Submit</button>
    	    </div>
    	</fieldset>
    </form>
  </div>
</div>
The CSS classes used in the HTML template are part of the Bootstrap library used for making things pretty. Since this is a not a design tutorial, I won't be talking much about the CSS aspects of the form unless necessary.
Basic Form Setup
To create a Reactive form, you need to import the
ReactiveFormsModulefrom@angular/formsand add it to the imports array in app.module.ts.app/app.module.ts
// Import ReactiveFormsModule
import { ReactiveFormsModule } from '@angular/forms';

@NgModule({
  .
  .
  //Add the module to the imports Array
  imports: [
    BrowserModule,
    ReactiveFormsModule
 .
 .
})
export class AppModule { }
Next, create a User model for the registration form. We can either use a class or an interface for creating the model. For this tutorial, I am going to export a class with the following properties.
app/User.ts
export class User {

    id: number;
    email: string;
    //Both the passwords are in a single object
    password: {
	  pwd: string;
	  confirmPwd: string;
	};

	gender: string;
    terms: boolean;

	constructor(values: Object = {}) {
	  //Constructor initialization
      Object.assign(this, values);
  }

}
Now, create an instance of the User model in the
SignupFormcomponent.app/signup-form/signup-form.component.ts
import { Component, OnInit } from '@angular/core';
// Import the User model
import { User } from './../User';

@Component({
  selector: 'app-signup-form',
  templateUrl: './signup-form.component.html',
  styleUrls: ['./signup-form.component.css']
})
export class SignupFormComponent implements OnInit {

  //Gender list for the select control element
  private genderList: string[];
  //Property for the user
  private user:User;

  ngOnInit() {

    this.genderList =  ['Male', 'Female', 'Others'];


}
For the signup-form.component.html file, I am going to use the same HTML template discussed above, but with minor changes. The signup form has a select field with a list of options. Although that works, we will do it the Angular way by looping through the list using the
ngFordirective.app/signup-form/signup-form.component.html
<div class="row custom-row">
  <div class= "col-sm-5 custom-container jumbotron">

    <form class="form-horizontal">
        <fieldset>
          <legend>SignUp</legend>
.
.
            <!--- Gender Block -->
            <div class="form-group">
              <label for="select">Gender</label>
                   <select id="select">

        	         <option *ngFor = "let g of genderList"
        	           [value] = "g"> {{g}}
        	         </option>
        	       </select>
        	   </div>
.
.
    </fieldset>
    </form>
  </div>
</div>
Note: You might get an error that says No provider for ControlContainer. The error appears when a component has a <form> tag without a formGroup directive. The error will disappear once we add a FormGroup directive later in the tutorial.
We have a component, a model, and a form template at hand. What now? It's time to get our hands dirty and become acquainted with the APIs that you need to create reactive forms. This includes
FormControlandFormGroup.Tracking the State Using FormControl
While building forms with the reactive forms strategy, you won't come across the ngModel and ngForm directives. Instead, we use the underlying FormControl and FormGroup API.
A FormControl is a directive used to create a FormControl instance that you can use to keep track of a particular form element's state and its validation status. This is how FormControl works:
/* Import FormControl first */ import { FormControl } from '@angular/forms'; /* Example of creating a new FormControl instance */ export class SignupFormComponent { email = new FormControl(); }emailis now a FormControl instance, and you can bind it to an input control element in your template as follows:<h2>Signup</h2> <label class="control-label">Email: <input class="form-control" [formControl]="email"> </label>
The template form element is now bound to the FormControl instance in the component. What that means is any change to the input control value gets reflected at the other end.
A FormControl constructor accepts three arguments—an initial value, an array of sync validators, and an array of async validators—and as you might have guessed, they are all optional. We will be covering the first two arguments here.
import { Validators } from '@angular/forms';
.
.
.
/* FormControl with initial value and a validator */

  email = new FormControl('bob@example.com', Validators.required);
Angular has a limited set of built-in validators. The popular validator methods include
Validators.required,Validators.minLength,Validators.maxlength, andValidators.pattern. However, to use them, you have to import the Validator API first.For our signup form, we have multiple input control fields (for email and password), a selector field, and a checkbox field. Rather than creating individual
FormControlobjects, wouldn't it make more sense to group all theseFormControls under a single entity? This is beneficial because we can now track the value and the validity of all the sub-FormControl objects in one place. That's whatFormGroupis for. So we will register a parent FormGroup with multiple child FormControls.Group Multiple FormControls With FormGroup
To add a FormGroup, import it first. Next, declare signupForm as a class property and initialize it as follows:
app/signup-form/signup-form.component.ts
//Import the API for building a form
import { FormControl, FormGroup, Validators } from '@angular/forms';


export class SignupFormComponent implements OnInit {

    genderList: String[];
    signupForm: FormGroup;
    .
    .

   ngOnInit() {

    this.genderList =  ['Male', 'Female', 'Others'];

    this.signupForm = new FormGroup ({
    	email: new FormControl('',Validators.required),
		pwd: new FormControl(),
		confirmPwd: new FormControl(),
		gender: new FormControl(),
		terms: new FormControl()
	})

   }
}
Bind the FormGroup model to the DOM as follows:
app/signup-form/signup-form.component.html
    <form class="form-horizontal"  [formGroup]="signupForm" >
        <fieldset>
    	  <legend>SignUp</legend>

            <!--- Email Block -->
            <div class="form-group">
    	      <label for="inputEmail">Email</label>
    		  <input type="text" formControlName = "email"
                id="inputEmail"
    	        placeholder="Email">

            .
            .

        </fieldset>
    </form>
[formGroup] = "signupForm"tells Angular that you want to associate this form with theFormGroupdeclared in the component class. When Angular seesformControlName="email", it checks for an instance of FormControl with the key valueemailinside the parent FormGroup.Similarly, update the other form elements by adding a
formControlName="value"attribute as we just did here.To see if everything is working as expected, add the following after the form tag:
app/signup-form/signup-form.component.html
<!--- Log the FormGroup values to see if the binding is working -->
    <p>Form value {{ signupForm.value | json }} </p>
     <p> Form status {{ signupForm.status | json}} </p>
Pipe the
SignupFormproperty through theJsonPipeto render the model as JSON in the browser. This is helpful for debugging and logging. You should see a JSON output like this.
There are two things to note here:
- The JSON doesn't exactly match the structure of the user model that we created earlier.
- The signupForm.status displays that the status of the form is INVALID. This clearly shows that the
Validators.requiredon the email control field is working as expected.
The structure of the form model and the data model should match.
// Form model
 {
    "email": "",
    "pwd": "",
    "confirmPwd": "",
    "gender": "",
    "terms": false
}

//User model
{
    "email": "",
    "password": {
	  "pwd": "",
	  "confirmPwd": "",
	},
	"gender": "",
    "terms": false
}
To get the hierarchical structure of the data model, we should use a nested FormGroup. Additionally, it's always a good idea to have related form elements under a single FormGroup.
Nested FormGroup
Create a new FormGroup for the password.
app/signup-form/signup-form.component.ts
    this.signupForm = new FormGroup ({
    	email: new FormControl('',Validators.required),
		password: new FormGroup({
			pwd: new FormControl(),
			confirmPwd: new FormControl()
		}),
		gender: new FormControl(),
		terms: new FormControl()
	})
Now, to bind the new form model with the DOM, make the following changes:
app/signup-form/signup-form.component.html
<!--- Password Block -->
    <div formGroupName = "password">
	   	<div class="form-group">
	      <label for="inputPassword">Password</label>
	      <input type="password" formControlName = "pwd"
            id="inputPassword"
            placeholder="Password">
	    </div>

	    <div class="form-group">
	      <label for="confirmPassword" >Confirm Password</label>
	      <input type="password" formControlName = "confirmPwd"
            id="confirmPassword"
            placeholder="Password">
	    </div>
    </div>
formGroupName = "password"performs the binding for the nested FormGroup. Now, the structure of the form model matches our requirements.Form value: { "email": "", " password": { "pwd": null, "confirmPwd": null }, "gender": null, "terms": null } Form status "INVALID"Next up, we need to validate the form controls.
Validating the Form
We have a simple validation in place for the email input control. However, that's not sufficient. Here is the entire list of our requirements for the validation.
- All form control elements are required.
- Disable the submit button until the status of the form is VALID.
- The email field should strictly contain an email id.
- The password field should have a minimum length of 8.

The first one is easy. Add
Validator.requiredto all the FormControls in the form model.app/signup-form/signup-form.component.ts
    this.signupForm = new FormGroup ({
		email: new FormControl('',Validators.required),
		password: new FormGroup({
			pwd: new FormControl('', Validators.required),
			confirmPwd: new FormControl('', Validators.required)
		}),
		gender: new FormControl('', Validators.required),
        //requiredTrue so that the terms field isvalid only if checked
		terms: new FormControl('', Validators.requiredTrue)
	})
Next, disable the button while the form is INVALID.
app/signup-form/signup-form.component.html
<!--- Buttons Block -->
    <div class="form-group">
        <button type="reset" class="btn btn-default">Cancel</button>
        <button type="submit" [disabled] = "!signupForm.valid" class="btn btn-primary">Submit</button>
    </div>
To add a constraint on email, you can either use the default
Validators.emailor create a customValidators.pattern()that specifies regular expressions like the one below:email: new FormControl('', [Validators.required, Validators.pattern('[a-z0-9._%+-]+@[a-z0-9.-]+\.[a-z]{2,3}$')])Use the
minLengthvalidator for the password fields.password: new FormGroup({ pwd: new FormControl('', [Validators.required, Validators.minLength(8)]), confirmPwd: new FormControl('', [Validators.required, Validators.minLength(8)]) }),That's it for the validation. However, the form model logic appears cluttered and repetitive. Let's clean that up first.
Refactoring the Code Using FormBuilder
Angular provides you with a syntax sugar for creating new instances of FormGroup and FormControl called FormBuilder. The FormBuilder API doesn't do anything special other than what we've covered here.
It simplifies our code and makes the process of building a form easy on the eyes. To create a FormBuilder, you have to import it into signup-form.component.ts and inject the FormBuilder into the constructor.
app/signup-form/signup-form.component.ts
import { FormBuilder, FormGroup, Validators } from '@angular/forms';
.
.
export class SignupFormComponent implements OnInit {
    signupForm: FormGroup; // Declare the signupForm

    //Inject the formbuilder into the constructor
	constructor(private fb:FormBuilder) {}

    ngOnInit() {

    ...

    }

}
Instead of a creating a new
FormGroup(), we are usingthis.fb.groupto build a form. Except for the syntax, everything else remains the same.app/signup-form/signup-form.component.ts
	ngOnInit() {
        ...

		this.signupForm  = this.fb.group({
			email: ['',[Validators.required,
						Validators.pattern('[a-z0-9._%+-]+@[a-z0-9.-]+\.[a-z]{2,3}$')]],
			password: this.fb.group({
				pwd: ['', [Validators.required,
						   Validators.minLength(8)]],
				confirmPwd: ['', [Validators.required,
								  Validators.minLength(8)]]
			}),
			gender: ['', Validators.required],
			terms: ['', Validators.requiredTrue]
		})
}
Displaying Validation Errors
For displaying the errors, I am going to use the conditional directive
ngIfon a div element. Let's start with the input control field for email:<!-- Email error block --> <div *ngIf="signupForm.controls.email.invalid && signupForm.controls.email.touched" Email is invalid </div>There are a couple of issues here.
- Where did
invalidandpristinecome from? -
signupForm.controls.email.invalidis too long and deep. - The error doesn't explicitly say why it's invalid.
To answer the first question, each FormControl has certain properties like
invalid,valid,pristine,dirty,touched, anduntouched. We can use these to determine whether an error message or a warning should be displayed or not. The image below describes each of those properties in detail.
So the div element with the
*ngIfwill be rendered only if the email is invalid. However, the user will be greeted with errors about the input fields being blank even before they have a chance to edit the form.To avoid this scenario, we've added the second condition. The error will be displayed only after the control has been visited.
To get rid of the long chain of method names (
signupForm.controls.email.invalid), I am going to add a couple of shorthand getter methods. This keeps them more accessible and short.app/signup-form/signup-form.component.ts
export class SignupFormComponent implements OnInit {
...

    get email() { return this.signupForm.get('email'); }

	get password() { return this.signupForm.get('password'); }

	get gender() { return this.signupForm.get('gender'); }

	get terms() { return this.signupForm.get('terms'); }

}
To make the error more explicit, I've added nested ngIf conditions below:
app/signup-form/signup-form.component.html
<!-- Email error block -->
	<div *ngIf="email.invalid && email.touched"
	 	class="col-sm-3 text-danger">

	 	<div *ngIf = "email.errors?.required">
	 		Email field can't be blank
	 	</div>

	 	<div *ngIf = "email.errors?.pattern">
	 		The email id doesn't seem right
	 	</div>

	 </div>
We use
email.errorsto check all possible validation errors and then display them back to the user in the form of custom messages. Now, follow the same procedure for the other form elements. Here is how I've coded the validation for the passwords and the terms input control.app/signup-form/signup-form.component.html
 <!-- Password error block -->
       <div *ngIf="(password.invalid && password.touched)"
 		class="col-sm-3 text-danger">

 		Password needs to be more than 8 characters
  	</div>

.
.
.
 <!--- Terms error block -->
   	  <div *ngIf="(terms.invalid && terms.touched)"
	 	class="col-sm-3 text-danger">

 		Please accept the Terms and conditions first.
   	  </div>
   	</div>
Submit the Form Using ngSubmit
We are nearly done with the form. It lacks the submit functionality, which we are about to implement now.
<form class="form-horizontal"
    [formGroup]="signupForm"
    (ngSubmit)="onFormSubmit()" >
On form submit, the form model values should flow into the component's user property.
app/signup-form/signup-form.component.ts
public onFormSubmit() {
    	if(this.signupForm.valid) {
			this.user = this.signupForm.value;
			console.log(this.user);
            /* Any API call logic via services goes here */
		}
	}
Final Demo
Here is the final version of the application. I've added a few Bootstrap classes to make the form pretty.
Wrapping It Up
If you've been following this tutorial series from the start, we had a hands-on experience with two popular form building technologies in Angular. The template-driven and model-driven techniques are two ways of achieving the same thing. Personally, I prefer to use the reactive forms for the following reasons:
- All the form validation logic will be located in a single place—inside your component class. This is way more productive than the template approach, where the ngModel directives are scattered across the template.
- Unlike template-driven forms, Model-driven forms are easier to test. You don't have to resort to end-to-end testing libraries to test your form.
- Validation logic will go inside the component class and not in the template.
- For a form with a large number of form elements, this approach has something called FormBuilder to make the creation of FormControl objects easier.
We missed out on one thing, and that is writing a validator for the password mismatch. In the final part of the series, we will cover everything you need to know about creating custom validator functions in Angular. Stay tuned until then.
In the meantime, there are plenty of frameworks and libraries to keep you busy, with lots of items on Envato Market to read, study, and use.

martijn broeders
founder/ strategic creative bij shineyrock web design & consultancy
e-mail: .(JavaScript must be enabled to view this email address)
telefoon: 434 210 0245
Per - categorie
Op - datum
-
December, 2023
-
The Best Small Business Web Designs by DesignRush
/ 2
2 -
October, 2022
-
Create Modern Vue Apps Using Create-Vue and Vite
/ 9 -
September, 2022
-
How to Fix the “There Has Been a Critical Error in Your Website” Error in WordPress
/ 3 -
How To Fix The “There Has Been A Critical Error in Your Website” Error in WordPress
-
August, 2022
-
How to Create a Privacy Policy Page in WordPress
/ 7 -
WordPress Website Maintenance Guide For Beginners
/ 8 -
April, 2022
-
How Long Does It Take to Learn JavaScript?
/ -1
-1 -
How Long Does it Take to Learn JavaScript
/ 1 -
January, 2022
-
The Best Way to Deep Copy an Object in JavaScript
/ -1 -
December, 2021
-
/ 4
-
/ -5
-
Adding and Removing Elements From Arrays in JavaScript
/ -1 -
Create a JavaScript AJAX Post Request: With and Without jQuery
/ 8 -
November, 2021
-
5 Real-Life Uses for the JavaScript reduce() Method
/ -9 -
July, 2021
-
How to Enable or Disable a Button With JavaScript: jQuery vs. Vanilla
/ 4 -
How to Enable or Disable a Button With JavaScript: jQuery vs Vanilla
/ -4 -
Confirm Yes or No With JavaScript
/ -4 -
June, 2021
-
How to Change the URL in JavaScript: Redirecting
/ -1 -
May, 2021
-
27 Best Tab and Accordion Widget Plugins for WordPress (Free & Premium)
/ 13 -
21 Best Tab and Accordion Widget Plugins for WordPress (Free & Premium)
/ -11 -
30 HTML Best Practices for Beginners
/ -7 -
31 Best WordPress Calendar Plugins and Widgets (With 5 Free Plugins)
/ 1 -
25 Ridiculously Impressive HTML5 Canvas Experiments
/ -3 -
/ 1
-
How to Implement Email Verification for New Members
/ 2 -
How to Create a Simple Web-Based Chat Application
/ 6 -
April, 2021
-
30 Popular WordPress User Interface Elements
/ -2 -
Top 18 Best Practices for Writing Super Readable Code
/ 1 -
Best Affiliate WooCommerce Plugins Compared
/ -11 -
March, 2021
-
18 Best WordPress Star Rating Plugins
/ 14 -
10+ Best WordPress Twitter Widgets
/ 2 -
20+ Best WordPress Booking and Reservation Plugins
/ 4 -
February, 2021
-
Working With Tables in React: Part Two
/ -3 -
Best CSS Animations and Effects on CodeCanyon
/ -17 -
30 CSS Best Practices for Beginners
/ 3 -
How to Create a Custom WordPress Plugin From Scratch
/ 2 -
May, 2020
-
10 Best Responsive HTML5 Sliders for Images and Text… and 3 Free Options
/ -6 -
16 Best Tab and Accordion Widget Plugins for WordPress
/ -6 -
April, 2020
-
18 Best WordPress Membership Plugins and 5 Free Plugins
/ 3 -
25 Best WooCommerce Plugins for Products, Pricing, Payments and More
/ 2 -
10 Best WordPress Twitter Widgets
1 / 10 -
March, 2020
-
12 Best Contact Form PHP Scripts for 2020
/ -2 -
September, 2017
-
February, 2020
-
20 Popular WordPress User Interface Elements
/ -4 -
10 Best WordPress Star Rating Plugins
/ -4 -
January, 2020
-
12 Best CSS Animations on CodeCanyon
/ -2 -
12 Best WordPress Booking and Reservation Plugins
/ 1 -
20 Best WordPress Calendar Plugins and Widgets
/ -4 -
December, 2019
-
12 Elegant CSS Pricing Tables for Your Latest Web Project
/ 8 -
24 Best WordPress Form Plugins for 2020
/ -2 -
September, 2019
-
Getting Started With Django: Newly Updated Course
/ -1 -
July, 2019
-
Create a Blog for Each Category or Department in Your WooCommerce Store
/ 3 -
April, 2019
-
8 Best WordPress Booking and Reservation Plugins
/ -15 -
March, 2019
-
Best Exit Popups for WordPress Compared
/ 18 -
Best Exit Popups for WordPress Compared
/ -3 -
11 Best Tab & Accordion WordPress Widgets & Plugins
/ -10 -
12 Best Tab & Accordion WordPress Widgets & Plugins
1 / 1 -
February, 2019
-
New Course: Practical React Fundamentals
/ 2 -
January, 2019
-
Short Course: Better Angular App Architecture With Modules
/ 3 -
Preview Our New Course on Angular Material
/ 3 -
Build Your Own CAPTCHA and Contact Form in PHP
/ -3 -
December, 2018
-
Object-Oriented PHP With Classes and Objects
/ 1 -
Best Practices for ARIA Implementation
/ -5 -
Accessible Apps: Barriers to Access and Getting Started With Accessibility
/ -4 -
November, 2018
-
Dramatically Speed Up Your React Front-End App Using Lazy Loading
/ 17 -
October, 2018
-
15 Best Modern JavaScript Admin Templates for React, Angular, and Vue.js
/ -17 -
15 Best Modern JavaScript Admin Templates for React, Angular and Vue.js
/ 3 -
19 Best JavaScript Admin Templates for React, Angular, and Vue.js
/ 3 -
New Course: Build an App With JavaScript and the MEAN Stack
/ 10 -
Hands-on With ARIA: Accessibility Recipes for Web Apps
/ 6 -
10 Best WordPress Facebook Widgets
13 -
September, 2018
-
Hands-on With ARIA: Accessibility for eCommerce
/ 6 -
New eBooks Available for Subscribers
/ -8 -
Hands-on With ARIA: Homepage Elements and Standard Navigation
/ 11 -
/ -5
-
Site Accessibility: Getting Started With ARIA
/ 5 -
August, 2018
-
How Secure Are Your JavaScript Open-Source Dependencies?
/ -3 -
New Course: Secure Your WordPress Site With SSL
/ -2 -
Testing Components in React Using Jest and Enzyme
/ -8 -
Testing Components in React Using Jest: The Basics
/ -5 -
July, 2018
-
15 Best PHP Event Calendar and Booking Scripts
/ -3 -
June, 2018
-
Create Interactive Gradient Animations Using Granim.js
/ 11 -
How to Build Complex, Large-Scale Vue.js Apps With Vuex
1 / -1 -
Examples of Dependency Injection in PHP With Symfony Components
/ -5 -
May, 2018
-
Set Up Routing in PHP Applications Using the Symfony Routing Component
1 / 8 -
A Beginner’s Guide to Regular Expressions in JavaScript
/ 9 -
Introduction to Popmotion: Custom Animation Scrubber
/ -6 -
Introduction to Popmotion: Pointers and Physics
/ -10 -
New Course: Connect to a Database With Laravel’s Eloquent ORM
/ -6 -
How to Create a Custom Settings Panel in WooCommerce
/ -15 -
Building the DOM faster: speculative parsing, async, defer and preload
1 / 4 -
20 Useful PHP Scripts Available on CodeCanyon
3 / 51 -
April, 2018
-
Introduction to the Stimulus Framework
/ -12 -
Single-Page React Applications With the React-Router and React-Transition-Group Modules
-
/ 7
-
12 Best Contact Form PHP Scripts
1 / -3 -
Getting Started With the Mojs Animation Library: The ShapeSwirl and Stagger Modules
-
Getting Started With the Mojs Animation Library: The Shape Module
/ -1 -
Getting Started With the Mojs Animation Library: The HTML Module
/ 4 -
Project Management Considerations for Your WordPress Project
/ -8 -
8 Things That Make Jest the Best React Testing Framework
/ 6 -
March, 2018
-
Creating an Image Editor Using CamanJS: Layers, Blend Modes, and Events
/ 1 -
New Short Course: Code a Front-End App With GraphQL and React
/ 1 -
Creating an Image Editor Using CamanJS: Applying Basic Filters
/ -12 -
Creating an Image Editor Using CamanJS: Creating Custom Filters and Blend Modes
/ -1 -
Modern Web Scraping With BeautifulSoup and Selenium
/ 1 -
Challenge: Create a To-Do List in React
1 / -2 -
Deploy PHP Web Applications Using Laravel Forge
/ -3 -
Getting Started With the Mojs Animation Library: The Burst Module
/ 4 -
/ -9
-
10 Things Men Can Do to Support Women in Tech
/ -2 -
February, 2018
-
A Gentle Introduction to Higher-Order Components in React: Best Practices
/ -5 -
A Gentle Introduction to HOC in React: Learn by Example
/ 3 -
A Gentle Introduction to Higher-Order Components in React
/ -6 -
Creating Pretty Popup Messages Using SweetAlert2
/ 7 -
Creating Stylish and Responsive Progress Bars Using ProgressBar.js
/ 16 -
18 Best Contact Form PHP Scripts for 2022
/ -2 -
How to Make a Real-Time Sports Application Using Node.js
/ -2 -
Creating a Blogging App Using Angular & MongoDB: Delete Post
/ -17 -
Set Up an OAuth2 Server Using Passport in Laravel
/ 1 -
Creating a Blogging App Using Angular & MongoDB: Edit Post
/ 1 -
Introduction to Mocking in Python
/ 1 -
Creating a Blogging App Using Angular & MongoDB: Show Post
/ 10 -
Creating a Blogging App Using Angular & MongoDB: Home
/ 6 -
/ 3
-
Creating a Blogging App Using Angular & MongoDB: Login
/ 12 -
Creating Your First Angular App: Implement Routing
/ 12 -
Persisted WordPress Admin Notices: Part 4
/ -2 -
Creating Your First Angular App: Components, Part 2
/ 3 -
Persisted WordPress Admin Notices: Part 3
/ 4 -
How Laravel Broadcasting Works
/ -1 -
/ 7
-
Persisted WordPress Admin Notices: Part 2
/ -2 -
Create Your First Angular App: Storing and Accessing Data
/ 6 -
Persisted WordPress Admin Notices: Part 1
/ -1 -
Error and Performance Monitoring for Web & Mobile Apps Using Raygun
/ 6 -
Using Luxon for Date and Time in JavaScript
7 / -3 -
January, 2018
-
How to Create an Audio Oscillator With the Web Audio API
/ -7 -
How to Cache Using Redis in Django Applications
/ 2 -
20 Essential WordPress Utilities to Manage Your Site
/ -6 -
Introduction to API Calls With React and Axios
/ 13 -
Beginner’s Guide to Angular 4: HTTP
/ 13 -
Rapid Web Deployment for Laravel With GitHub, Linode, and RunCloud.io
/ 8 -
Beginners Guide to Angular 4: Routing
/ -10 -
Beginner’s Guide to Angular 4: Services
/ 1 -
Beginner’s Guide to Angular 4: Components
/ 1 -
Creating a Drop-Down Menu for Mobile Pages
/ 9 -
Introduction to Forms in Angular 4: Writing Custom Form Validators
/ 6 -
Getting Started With Redux: Connecting Redux With React
/ 14 -
Getting Started With Redux: Learn by Example
/ 14 -
Getting Started With Redux: Why Redux?
/ 11 -
How to Auto Update WordPress Salts
/ -4 -
How to Download Files in Python
/ -2 -
/ -19
-
Eloquent Mutators and Accessors in Laravel
1 / 15 -
/ -11
-
December, 2017
-
/ 13
-
10 Best HTML5 Sliders for Images and Text
/ 8 -
Site Authentication in Node.js: User Signup
/ -2 -
Creating a Task Manager App Using Ionic: Part 2
/ 2 -
Creating a Task Manager App Using Ionic: Part 1
/ 1 -
Introduction to Forms in Angular 4: Reactive Forms
/ 2 -
/ 4
-
Introduction to Forms in Angular 4: Template-Driven Forms
/ 4 -
24 Essential WordPress Utilities to Manage Your Site
/ -1 -
25 Essential WordPress Utilities to Manage Your Site
/ -10 -
Get Rid of Bugs Quickly Using BugReplay
1 / -16 -
Manipulating HTML5 Canvas Using Konva: Part 1, Getting Started
/ 6 -
10 Must-See Easy Digital Downloads Extensions for Your WordPress Site
/ -2 -
22 Best WordPress Booking and Reservation Plugins
/ -5 -
Understanding ExpressJS Routing
/ -6 -
15 Best WordPress Star Rating Plugins
/ 12 -
Creating Your First Angular App: Basics
/ -1 -
November, 2017
-
Inheritance and Extending Objects With JavaScript
/ -10 -
Introduction to the CSS Grid Layout With Examples
1 / 3 -
/ 5
-
Performant Animations Using KUTE.js: Part 5, Easing Functions and Attributes
/ -6 -
Performant Animations Using KUTE.js: Part 4, Animating Text
/ -10 -
Performant Animations Using KUTE.js: Part 3, Animating SVG
/ -8 -
New Course: Code a Quiz App With Vue.js
/ -2 -
Performant Animations Using KUTE.js: Part 2, Animating CSS Properties
/ 1 -
/ 8
-
Performant Animations Using KUTE.js: Part 1, Getting Started
/ 1 -
10 Best Responsive HTML5 Sliders for Images and Text (Plus 3 Free Options)
/ -3 -
Single-Page Applications With ngRoute and ngAnimate in AngularJS
/ -14 -
Deferring Tasks in Laravel Using Queues
/ -3 -
/ 2
-
Site Authentication in Node.js: User Signup and Login
/ 10 -
Working With Tables in React, Part Two
/ -17 -
Working With Tables in React, Part One
/ 1 -
How to Set Up a Scalable, E-Commerce-Ready WordPress Site Using ClusterCS
/ -2 -
New Course on WordPress Conditional Tags
/ 2 -
October, 2017
-
/ -11
-
Building With Vue.js 2 and Firebase
6 / 11 -
/ -8
-
/ 1
-
Best Unique Bootstrap JavaScript Plugins
/ -6 -
/ -1
-
Essential JavaScript Libraries and Frameworks You Should Know About
/ 6 -
/ 3
-
Vue.js Crash Course: Create a Simple Blog Using Vue.js
/ -14 -
Build a React App With a Laravel RESTful Back End: Part 1, Laravel 5.5 API
/ 2 -
API Authentication With Node.js
/ -4 -
Beginner’s Guide to Angular: HTTP
/ 8 -
Beginner’s Guide to Angular: Routing
/ -4 -
Beginners Guide to Angular: Routing
/ -4 -
Beginner’s Guide to Angular: Services
/ 2 -
Beginner’s Guide to Angular: Components
/ 1 -
September, 2017
-
How to Create a Custom Authentication Guard in Laravel
/ 5 -
Learn Computer Science With JavaScript: Part 3, Loops
/ -3 -
Build Web Applications Using Node.js
/ 1 -
Learn Computer Science With JavaScript: Part 4, Functions
/ 5 -
Learn Computer Science With JavaScript: Part 2, Conditionals
/ 13 -
Create Interactive Charts Using Plotly.js, Part 5: Pie and Gauge Charts
/ -8 -
Create Interactive Charts Using Plotly.js, Part 4: Bubble and Dot Charts
/ 15 -
Create Interactive Charts Using Plotly.js, Part 3: Bar Charts
/ -10 -
Awesome JavaScript Libraries and Frameworks You Should Know About
/ -6 -
Create Interactive Charts Using Plotly.js, Part 2: Line Charts
/ -8 -
Bulk Import a CSV File Into MongoDB Using Mongoose With Node.js
/ -5 -
Build a To-Do API With Node, Express, and MongoDB
/ -8 -
Getting Started With End-to-End Testing in Angular Using Protractor
/ 11 -
TypeScript for Beginners, Part 4: Classes
/ -15 -
Object-Oriented Programming With JavaScript
/ 4 -
10 Best Affiliate WooCommerce Plugins Compared
/ 6 -
Stateful vs. Stateless Functional Components in React
/ 8 -
Make Your JavaScript Code Robust With Flow
/ -2 -
Build a To-Do API With Node and Restify
/ 7 -
Testing Components in Angular Using Jasmine: Part 2, Services
/ 3 -
Testing Components in Angular Using Jasmine: Part 1
/ -1 -
Creating a Blogging App Using React, Part 6: Tags
/ -10 -
August, 2017
-
React Crash Course for Beginners, Part 3
/ 4 -
React Crash Course for Beginners, Part 2
/ 5 -
React Crash Course for Beginners, Part 1
/ 3 -
Set Up a React Environment, Part 4
1 / 9 -
Set Up a React Environment, Part 3
/ -9 -
New Course: Get Started With Phoenix
/ -7 -
Set Up a React Environment, Part 2
/ 2 -
Command Line Basics and Useful Tricks With the Terminal
/ 8 -
How to Create a Real-Time Feed Using Phoenix and React
/ -2 -
Build a React App With a Laravel Back End: Part 2, React
/ 2 -
Build a React App With a Laravel RESTful Back End: Part 1, Laravel 9 API
/ -4 -
Creating a Blogging App Using React, Part 5: Profile Page
/ -2 -
Pagination in CodeIgniter: The Complete Guide
/ 24 -
JavaScript-Based Animations Using Anime.js, Part 4: Callbacks, Easings, and SVG
-
JavaScript-Based Animations Using Anime.js, Part 3: Values, Timeline, and Playback
-
Learn to Code With JavaScript: Part 1, The Basics
/ 4 -
July, 2017
-
10 Elegant CSS Pricing Tables for Your Latest Web Project
/ -9 -
Getting Started With the Flux Architecture in React
/ -2 -
Getting Started With Matter.js: The Composites and Composite Modules
/ 2 -
Getting Started With Matter.js: The Engine and World Modules
/ 14 -
10 More Popular HTML5 Projects for You to Use and Study
/ -21 -
Understand the Basics of Laravel Middleware
/ -1 -
Iterating Fast With Django & Heroku
/ 9 -
Creating a Blogging App Using React, Part 4: Update & Delete Posts
/ 5 -
Creating a jQuery Plugin for Long Shadow Design
/ -12 -
How to Register & Use Laravel Service Providers
2 / -13 -
Unit Testing in React: Shallow vs. Static Testing
/ 4 -
Creating a Blogging App Using React, Part 3: Add & Display Post
/ 14 -
June, 2017
-
Creating a Blogging App Using React, Part 2: User Sign-Up
20 / -4 -
Creating a Blogging App Using React, Part 1: User Sign-In
/ 6 -
9 More Popular HTML5 Projects for You to Use and Study
/ 15 -
Creating a Grocery List Manager Using Angular, Part 2: Managing Items
/ 8 -
9 Elegant CSS Pricing Tables for Your Latest Web Project
/ -3 -
Dynamic Page Templates in WordPress, Part 3
/ -4 -
Angular vs. React: 7 Key Features Compared
/ 6 -
Creating a Grocery List Manager Using Angular, Part 1: Add & Display Items
/ 1 -
New eBooks Available for Subscribers in June 2017
/ 7 -
Create Interactive Charts Using Plotly.js, Part 1: Getting Started
/ 10 -
The 5 Best IDEs for WordPress Development (And Why)
/ -2 -
33 Popular WordPress User Interface Elements
/ 2 -
New Course: How to Hack Your Own App
/ -11 -
How to Install Yii on Windows or a Mac
/ 3 -
What Is a JavaScript Operator?
/ -7 -
How to Register and Use Laravel Service Providers
/ 9
waly Good blog post. I absolutely love this…